Language:
Story Sequencing
Story Sequencing is a skill needed for comprehension. Comprehension is an ability to understand and remember what you have read. Practicing comprehension skills is just as important as practicing reading. For some it comes quite easy but for other children its a real struggle. With every story you read to a little child discuss the events in order. Let them tell you their favorite part or character. Talk about the pictures and how they make them feel. When the hungry caterpillar eats all that food does it make them hungry or full? Any question that gets them interested in the story builds their ability to comprehend and increases their ability to remember.
Supplies:
- Scissors
- Crayons or markers
- Clear Packing Tape
- Worksheet for each student here.
Directions:
- Give each student a worksheet(you can find it here.) With this worksheet you can practice finding colors. Start with the caterpillar in the upper left corner and ask the student to find a green crayon and color it green. Continue calling out colors as you work through the worksheet.
- Another activity while you are coloring the worksheet is to count the objects in each picture. 1 apple; 1, 2 pears, etc…
- After you have colored all the pictures on the worksheet have your student cut on the dotted line. For students just learning to use scissors make it easier for them by cutting them down to 4 pictures that are connected.
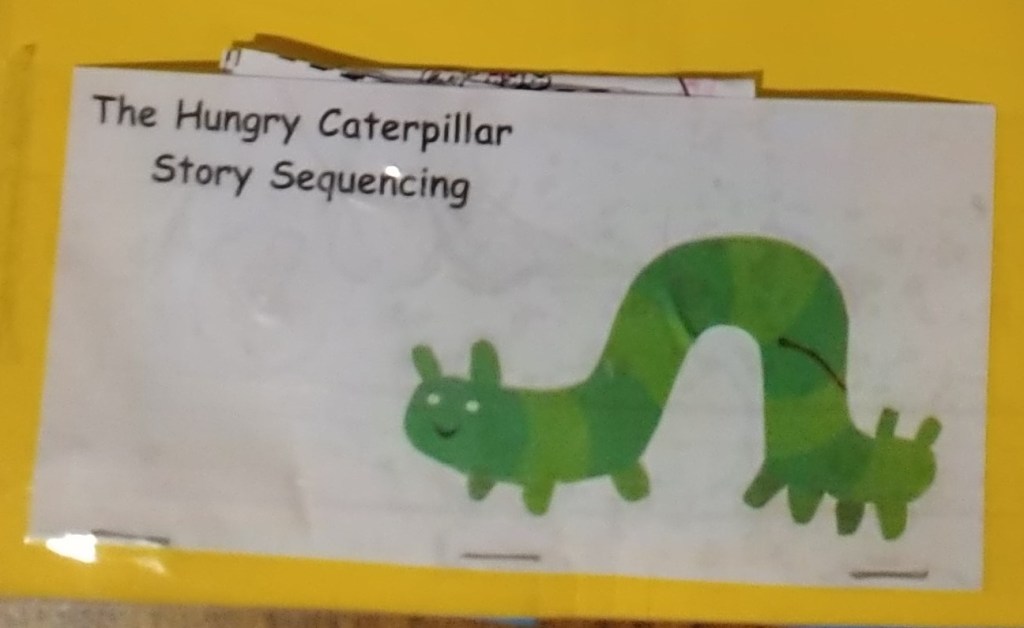
- The picture above is one that I made. Type into your document The Hungry Caterpillar Story Sequencing. I added the caterpillar by gluing it on. This piece of paper should be larger than the picture with 10 different pictures on it. You are making a pocket to store your Story Sequencing cards in that you just made. Tape the pocket onto your folder book using clear packing tape. The packing tape should cover all 4 edges. Next take your scissors or a knife and cut the top edge of the pocket so there is an opening to store your sequencing cards.
Days of the Week
Vocabulary is taught through using new words in every day conversations. Children are able to pick up the meaning of words that are used by adults in the context of conversation. Instead of saying in a couple days, say on Wednesday we will go swimming and then count the days. Today is Monday, tomorrow is Tuesday and then Wednesday. Two days until Wednesday when we go swimming. Another way to learn new vocabulary is through song. Here is a link to youtube for a days of the week song.
Supplies:
- Work Sheet for each student, (find it here)
- Scissors
- Clear Packing Tape
- Optional – Laminate the days of the week.
Directions:
- Print out the work sheets at 50% to reduce the size. This will fit your folder book better and make more room for other projects. (find it here)
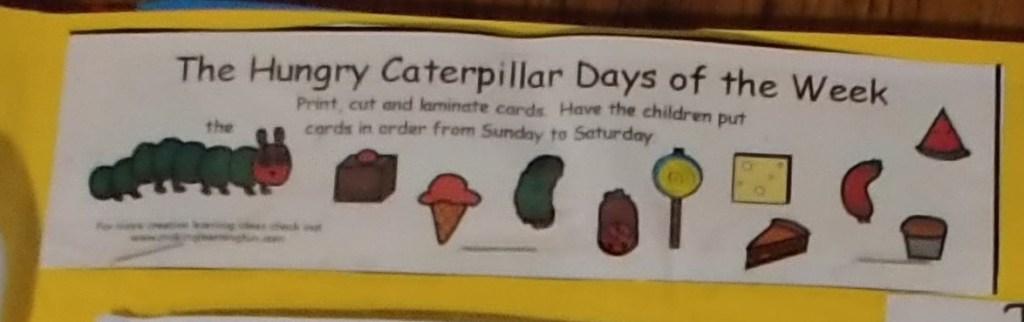
- Print the 1st item that says “The Hungry Caterpillar Days of the Week” at 65% so you can store the other days of the week inside it.
- Laminate the worksheet to make it more durable if you want to.
- Have your student cut on the lines to separate each day of the week.
- Attach the 1st item that you printed at 65% to the folder book with clear packing tape. The packing tape should cover all 4 edges. Next take your scissors or a knife and cut the top edge of the pocket so there is an opening to store your days of the week cards.
Colors
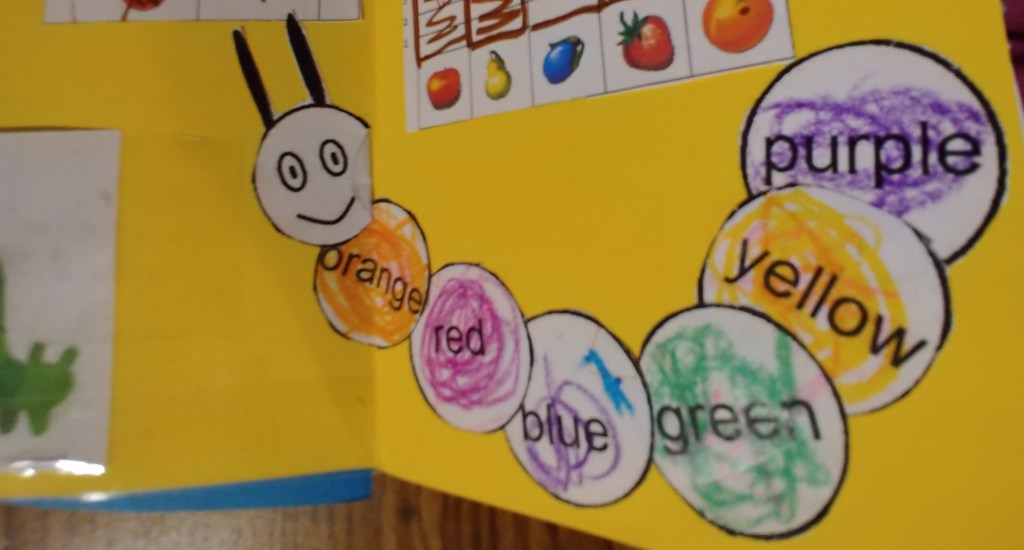
Time to learn colors! As you probably have already deduced, I taught this literature study to 3 yr old preschoolers. So we covered a lot of beginning concepts such as colors, numbers, art, life cycles, and healthy foods & junk foods. This is a cute little project for students to show off what colors they know. It’s also useful for older students to work on beginning sounds and even spelling and reading color words.
Supplies:
- Scissors
- Glue Sticks
- Crayons or Markers
- Worksheet(you can find it here)
Directions:
- Print a worksheet for each student(you can find it here)
- Students experienced with scissors can cut out there own circles or you can cut them out.
- Read the color’s name on the circle. Practice hearing the begining sounds of each color or for older students practice reading and spelling the colors.
- Ask the students to find the color and then color the circle.
- Use glue sticks to glue it to the folder book.
Art:
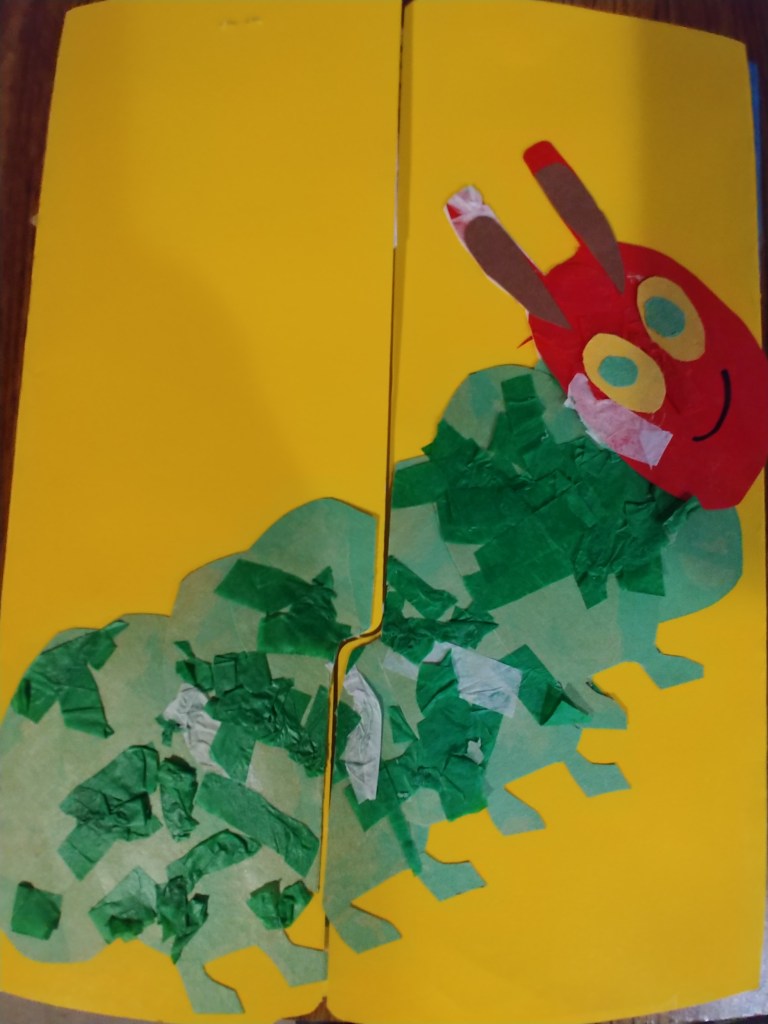
Eric Carle’s books are illustrated with vibrant colors that fuel a child’ imagination. He uses collages to build his illustrations. Collages are layers of paper that ultimately make your character or scene come alive! After layering the ripped papers Eric Carle shades the papers with crayons. This way of illustrating is easier to mimic and fun for all ages.
Supplies:
- Scissors
- Glue Sticks
- Paper or Cardstock
- Tissue Paper: green, light green, and white
- Construction Paper: red, green, brown, and yellow
- Pattern Printed: here
Directions:
- Imagine the caterpillar’s body in segments. Cut each segment of the caterpillars body out with feet using green construction paper. The caterpillar’s face on red construction paper, antenna on brown and eyes on yellow construction paper. You can print a pattern for the caterpillar here.
- Have students glue their caterpillar segments to a piece of cardstock or paper. or for younger children you can glue it on for them. (don’t glue all the way to the edges just the middle of each segment)
- After the caterpillar dries have your students glue(glue stick) cut or shredded tissue paper(green, light green and white) onto the caterpillar. Also glue on the eyes and antenna.
- Cut away the white paper or cardstock. Now you can glue your finished caterpillar onto the front of the folder book. I like to glue it on one flap cut next to the edge and then line it up and glue onto the other flap.
Science:
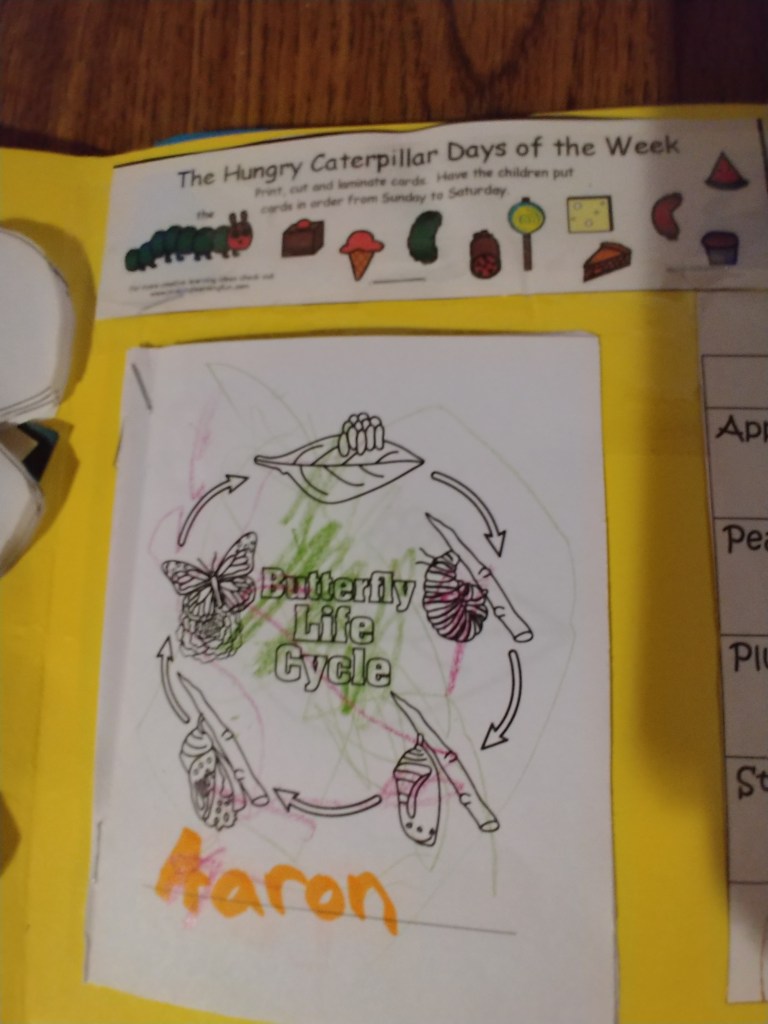
Butterfly Life Cycle
I Love the ideas at trilliummontessori.org! So many beautifully illustrated educational products that you can print. Here is the Butterfly Life Cycle from Trillim that you can print.
Supplies
- Stapler
- Scissors
- Glue Sticks
- Crayons
- Printed Butterfly Life Cycle: one for each student
Directions
- Cut out the pages of the Butterfly Life Cycle book for each student. If your student is older this is great time to practice cutting with scissors.
- Have the students color one page at a time. While they are coloring talk about each page and the steps in the Butterfly Life Cycle. Here is a you tube video on the Butterfly Life Cycle.
- There are 3 different ways I would handle writing their names and the names of each part of the Butterfly Life Cycle. First, you can just write each name for them. Second, (the method I prefer) is to write the names with a highlighter marker. This will allow the child to trace the name. Third, have your older children write them in. Sometimes this is even difficult for an older child because the spacing is not what they are use to.
- Staple the book together in the order of the Butterfly’s Life Cycle and glue onto their folder book.
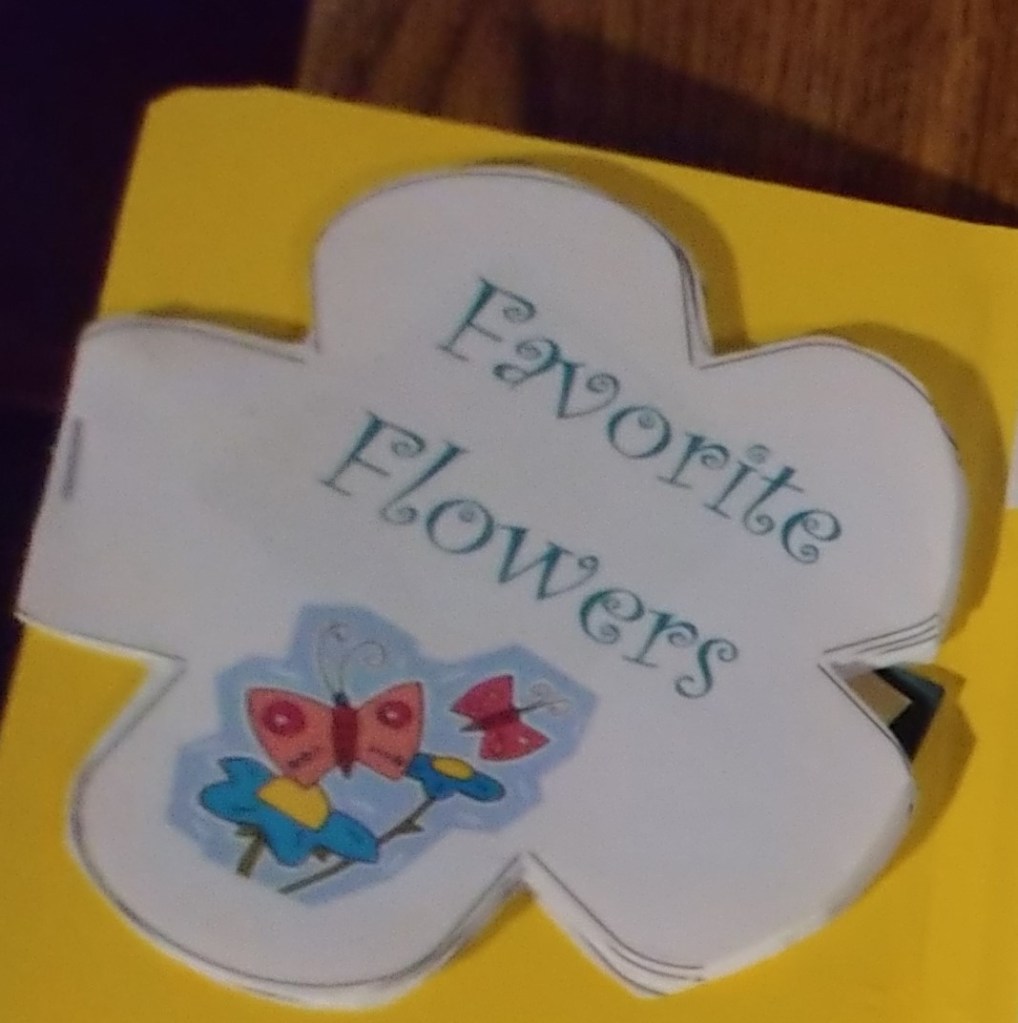
What Do Butterflies Eat?
Homeschool Share is another favorite site of mine. They are definitely good at creating meaningful folderbooks and have materials for the younger and older child. All of their materials are free and easy to use. You can print the materials needed to make the “Favorite Flowers” book here.
Supplies
- Stapler
- Glue Sticks
- Scissors
- Printed book for each student here
Directions
- Cut out the flower books for each student and the flower picture for each page. Older students can practice cutting around the flower petals and younger students can work on the cutting the straight line of the flower picture.
- While gluing the flower picture on each page, you could take this time to talk about why butterflies like certain flowers. Its more than the nectar/food. Butterflies are attracted to flowers that are the same color as them. This camouflage protects them from predators. Here is a YouTube clip of why butterflies are so colorful.
- Another topic is pollination. While the butterfly is siphoning the nectar of flowers pollen sticks to their legs. When they go to the next flower some of the pollen falls off. That’s how insects pollinate. Here is a beautiful YouTube clip of humming birds, bees, bats, and butterflies pollinating.
- Staple the pages together and glue the back of the last page to your folder book.
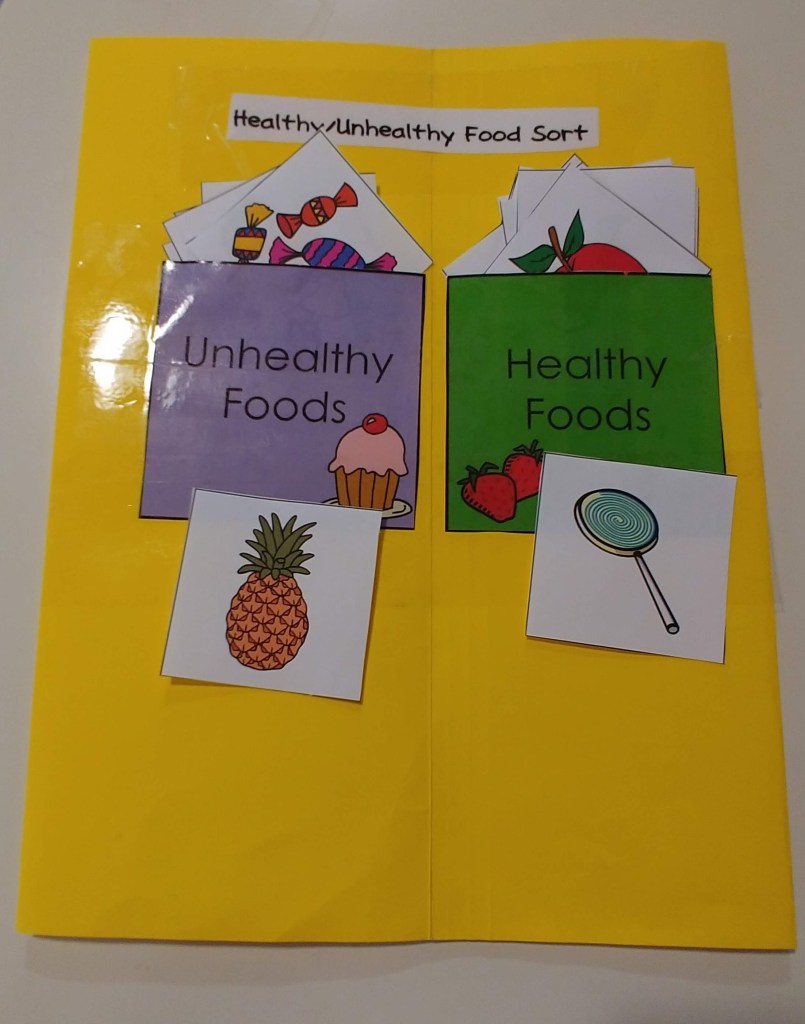
Healthy/Unhealthy Food Sort
It’s never too early to introduce healthy foods. Even very young children know the difference between a healthy food and junk food. This is a fun game for little hands to play. I love to place a game on the back of my folder books for each literature study. The students will bring the books home and continue to retain the what they have learned.
Supplies:
- Packing Tape
- Scissors
- Worksheet on Healthy Foods, 2 pages for each student(you can find it here)
Directions:
- Print two worksheets for each student(you can find it here)
- Cut out all of the pieces.
- On the back of each students folder book tape the title Healthy/Unhealthy Food Sort at the top.
- Below the title tape the Unhealthy Foods and Healthy Foods squares. The packing tape should cover all 4 edges. Next take your scissors or a knife and cut the top edge of the pocket so there is an opening to store and sort your Healthy/Unhealthy Foods.
Math:
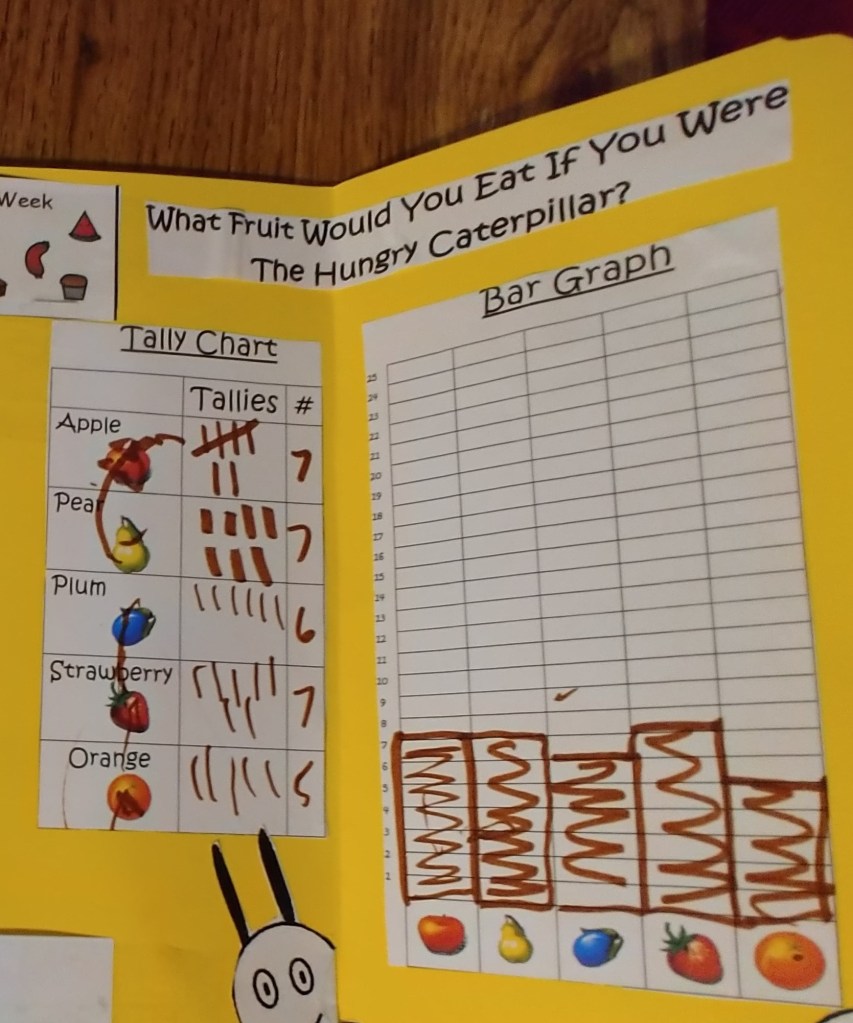
Tallies and Bar Graphs
This is a great project for counting, number recognition and adjectives. I know we are in the math section of this folder book but it never harms anyone to make silly adjectives. While you are talking about each piece of fruit and whether they like to eat it or not say something silly. Like who likes to eat wiggly wobbly pears? Then encourage each student to tell you their silly adjectives for the fruit in question.
Supplies:
- Glue Sticks
- Crayons or Markers
- Scissors
- Worksheet(you can find the it here)
Directions:
- Give each student a worksheet(you can find the it here) and talk about each fruit. Is it hard or soft, fuzzy or smooth, sweet or sour, do you eat the seeds or not… Make up silly adjectives for each fruit. Laughter is contagious.
- Vote to see how many students like each fruit and help each student mark tallies and then color in the bar graphs. Heads up, most children will want to fill in every square so I usually help each child individually.
- Cut out the title, tally chart and bar graph. Save the caterpillar for the story sequencing activity above.
- Glue all three pieces to your folder book with a glue stick.
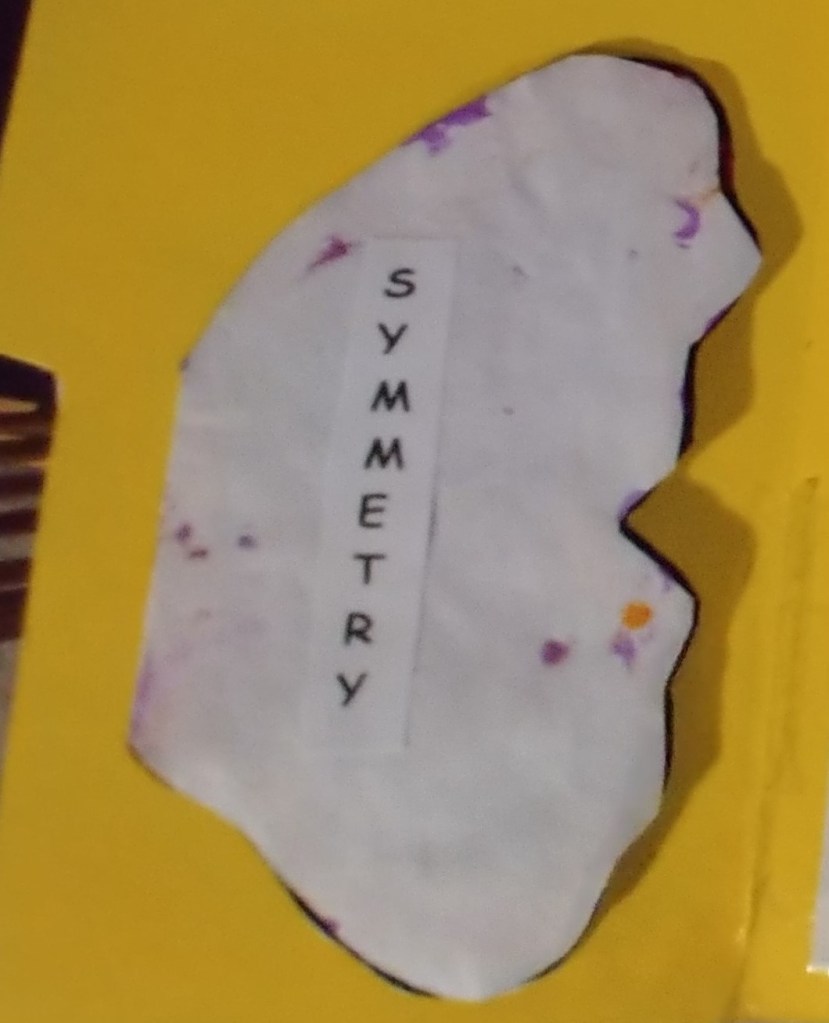
Symmetry
Butterflies are Symmetrical. This is an early math concept that children can see and make. It’s also a fun art project. If you fold an object in half and it is the same on both sides the object is symmetrical or has symmetry.
Supplies:
- Scissors
- Glue Stick
- Paint
- 1 worksheet for each student(you can find it here)
Directions:
- Print a worksheet for each student(you can find it here)
- Fold the butterfly in half and have the students put paint on only half of the butterfly.
- Fold the butterfly in half again and so that the paint is on both haves of the butterfly. Open the folded butterfly to reveal the symmetry of colors.
- When the butterfly is dry glue the back of the right wing to the folder book. Close the butterfly and write on the outside Symmetry.
Here are some videos on symmetry that you can watch with your students. Lucky Little Learners and Caitie’s Classroom Live
